Thursday, December 26, 2013

Broadcast through Airplay via Bluetooth

This is a post to add to what a colleague, and fellow ADE, Kyle Pearce posted today on creating a WIFI hotspot to allow you to connect your iPad to your MacBook and therefore broadcast through an Airplay enabled app (Apple TV, Reflector App or Air Server).

This is another way to do what Mr. Pearce did. My way is probably not have as fast of a connection but it is a simple way to quick share what you have on your iPad screen. I have found this useful in my school division as our iPads and computers both connect to different wireless network making it difficult to connect the two devices and mirror the iPad screen on your computer and then onto you SmartBoard or IWB.

In my example, I use Airplay to successfully mirror my iPad screen to my MacBook Pro.


Friday, November 8, 2013

Green Screen on the iPad

Green screen is one of the best learning tools in our learning commons. Our students are really making their learning come alive by recording video using the green screen.

DoInk has just released a new Green Screen App for the iPad. It is an easy to use App that allows you create green screen in one shot, rather than edit it using iMovie or another video editing application.


For this particular group of stuents, they wanted to be newscasters. We tried covering a desk with green paper and to see if we could make it work. The adjustable chroma filter in the DoInk Green Screen App allowed us to adjust the green colours and also the sensitivity. This worked out possibly better than what iMovie would be able to do.


All we had to do then was move the iPad around to make the size of the student was in proportion in relation to the background image. The finished video was slick! 


We have been trialling different workflows for using this app and then editing video in iMovie on our iMacs. The obvious way is to record the video and use the sync cables to download video to computers. In the absence of cables, we have been trialling the use of DropBox to drop videos in from iPad then downloading them to a share point on our server. It's working well!


Monday, November 4, 2013

Start Simple!

Learning to use the camera app is a great place to start when learning about the power an iPad can play in learning process.

This past month I have begun working with three classrooms who have never really used an iPad before. In my new school we have only had 5 iPads and have not used them a great deal to create knowledge. Last month we borrowed 10 iPads from our Outreach program provided by the CBE ILC (Innovative Learning Commons). 

I thought, what better way to begin using these devices than to use the camera app to take some photos around the school. Here's a snippet of what the three different classrooms did.

Graphemes Around the School

This grade 1 class used the iPad to take photos of letters (graphemes) that they could find around our building. Of course this was an easy task but a great one for students to get excited about finding the different letters they were learning about. 

We created our own success criteria from holding the device to taking the photo, and also to deleting images that weren't worthy of being downloaded.

After we gathered all the photos (which I downloaded from each iPad and then shared to our community folder) we talked about which images were good photos and which weren't so good and why that was.


Once all images were accessible from our server, the students then wrote their names (in Comic Life) using the different letters everyone in the class had found. 


Numbers Around Us

This grade one class put a spin on what they would take photos of. They went out around the school building to find different numbers they recognized. This proved more challenging as they found many numbers they could not recognize.


I downloaded the photos, as I did for the letters group. Once we had sorted them them somewhat, students were to choose numbers that were meaningful to them and then create an info graphic based on there chosen numbers. 


Colour, Colour Everywhere!

The kindergarten students took photos of different colours around our school. 

Once all photos are gathered in the same manner as above (we have not finished this project yet), we will use comic life again to share our work. We plan on adding photos and the names of each colour to a document then comparing to each other and building on to it further from there.

More to come on this project!

Saturday, October 12, 2013

iPad for Video Recording

One of the greatest uses of iPad in the classroom is for recording video. In our school, we have been trialling a green screen. Our students' are loving it!

We have been working on developing a standard workflow when recording and video on our iPads and then editing on a computer. Here's what we have come up with so far...


On the iPad

  1. Record video using iPad
  2. Connect to CBE LAWN network (for our district)
  3. Log into Google Drive App.
  4. Create, or find shared folder that whole class can access. This is a good idea as one person can remained logged in to save time. They can then upload multiple videos.
  5. Upload video to the Google Drive shared folder
  6. Delete video off iPad once uploaded

On the Computer

  1. Log into Computer
  2. Log into Google Drive in Safari
  3. Find the Shared folder
  4. Access the uploaded video files
  5. Download to computer and begin the editing process.
All done without wires!

The nice thing about this workflow is that when one iPad is being used, it can speed up the process without having plug it into a computer after every video has been recorded.


Saturday, May 25, 2013

Creating Stories - Making eBooks

Some students really struggle with narrative writing. Some struggle with writing in general. 

This week I began working with a class to create some interest around writing stories. We used technology to help us create our own picture books. Some students chose to find and use pictures from the Internet. Some choose to draw their pictures using the Doodle Buddy App. Some used Tux Paint (on the computers). Some even created their characters using a Minecraft Skin creator (www.minershoes.com). Once pictures and plans were created, we used Book Creator to compile and write the story.
This particular class is often unmotivated to work but once we introduced this innovative way to write a story, the attitude changed ten-fold! We found almost everyone of the students in this class were/are engaged throughout this writing process.

Not perfect!

These stories are certainly not going to be perfect narratives but this was an excellent way we could get them to buy-in to the writing process and begin to show some interest. From here, we plan to take it a step further and create some success criteria for writing a story. At that point, we can work on improving their writing.


The Process

The students were to plan their story with your typical mind-map style graphic organizer. Then they worked on planning the sequence of events. Once these were completed they started working on the making and compiling part.

Doodle buddy - Those that chose this app, drew their pictures then saved to the camera roll. The images could then be imported into Book Creator.


Tux Paint - Those that chose Tux Paint on the computer would draw their pictures in Tux Paint,  then export the image to their Google Drive, then - A fairly easy process once you've done it a couple of times. 


Minecraft Skin creator - These students created their [Minecraft looking] character then took a screen-shot of the finished person. They then uploaded to their Google drive, logged into Google drive on the iPad and then imported into Book Creator. There was also an option to then import Minecraft character into Doodle buddy to add more details or accessories to their character.

The interesting thing about using this website was that a lot of students who decided to find and copy their characters from Google changed their mind and began creating/making their own characters. What an amazing way to utilize a 'gaming' website.


The books are still a work in progress so will try to post more pictures as we go.

Thursday, May 16, 2013

Connecting to Air Server

I've been wanting to mirror my iPad and those of students' for a long time. I have always thought it wasn't possible in our system due to our iPads and Laptops being on different networks.

As of today, I have got it to work and am now in a testing phase to see how successful we can make this.

It's not 100% foolproof but will work better than connecting via a cable. This is how I'm trying to connect the iPads in our school to Air Server for Mac. I downloaded the free trial for Air Server. I will try to test it rigorously before purchases the $11 license.


  1. First of all you need to have the iPad and the computer connected together. This can be either through the same network (not possible for us) or share an internet connection. I tried both connecting my MacBook Pro to ethernet cable (blue cable) and also through wireless. For this example I used wireless as most of us would not be near a network port when doing this.
  2. This screen shot shows how I shared the internet connection (the tricky part is being able to do this - You need administration privileges to start this process).
  3. Next, I connected the iPad to my laptop through bluetooth. These are the messages you recieve in order to pair the two devices.
  4.  Mirroring the iPad - Next is the fun part and true test to see if it works.
Today I also had to students successfully connect to my computer to share their work. This opens up so many doors for collaborations and reflection.

I have a couple of questions to try and figure out before we purchase the licence.
  • Is this going to be OK with our School Tech Support department? Will they be happy with the iPad sharing the Macbook Pro connection.
  • Is the connection going to work for long periods of time?
    I also have a few good points that I've thought about too.

    • This will be very cost effective if we get it working. It will cost about $12 for 3 computers. That would be we could get approximately 25 licences for the price of 1 Apple TV.
    • Students will only connect to share and then they can turn back to their CBE LAWN (iPad, students and BYOD network).
    • The wireless options allows us to utilize it where the SmartBoard is and it still works
    • To save any connection issues, we can try to connect on a 'need to' basis. This will help with timing out connections, hopefully.
    I would love any feedback about this post. Especially if you've tried this in any other ways.

    CHEERS!


    Monday, May 13, 2013

    Hear it from the classroom!

    WARNING

    This post is wordy - Much more wordy that I usually write, but well worth the read, I HOPE!

    Lately, I've really noticed a lot of interest from teachers that are just getting into using iPads in their classrooms or have them in their school and are wondering how they might use them.

    I have been showing how we use them in our school and most of those projects have had me helping in the classroom or learning commons. However, some might say, "that's all and good but you're non-classroom based and it's easier when there is more help". I must admit this is true, but in our building a major part of my role is a learning coach for teachers (in an informal way). I help teachers integrate many technology applications into their students' learning tasks.

    So, to keep it real and to also speak to the power that the iPad has for learning, I have asked our classroom teachers to comment on their experiences with using iPads for learning:

    Grade 1-2 

    My grade 1/2 class has not only had the pleasure of having access to multiple iPads but we are also fortunate to have a technology expert in our building who has helped us to maximize our time using them. We have found that using iPads in a small group work makes for an optimal learning environment. For the most part, students are able to navigate educational apps with little coaching from an adult . We began with a simple app called “Skitch” that allows the student to take a photo and then make a labelled diagram, ie. body parts, parts of a plant, etc. We also used the iPads for making short swimming videos that we shared with parents at interview time and then the kids created stories using Comic Life and Book Creator. The iPads are much easier for the younger children to use than the laptops and the interest and excitement surrounding them is always high. Introducing this type of technology at such a young age has helped our students represent their learning in a dynamic, innovative way.

    Kindergarten

    While the Kindergarten students first viewed the iPads as a tool to play games, they have quickly realized that they can also be used in various ways to demonstrate their learning. We have had the opportunity to use the iPads on a fairly regular basis. Lucky for us, we have an iPad “expert” (Mr. Steve Clark), who has supported me with finding new ways to use these in the classroom. We have used the iPads for various activities with individual students, small groups and whole class learning. Some of the apps that we have found most useful for this age level are Comic Life; which we used back in September to take photos of ourselves and type our name, Book Creator; in which we created a class book focusing on the season of Spring, Skitch; where students had the opportunity to take a picture of themselves and label their body parts, and Doceri, a recordable whiteboard app, which we used with our Grade 6 buddies to draw and label different parts of a plant. We also used Aurasma to showcase videos of the Kindergarten students swimming and the parents were able to view these during interview time. Needless to say, the parents were most impressed not only with seeing their child swimming but also that their child was using an iPad at school. The students are always very excited to use the iPads and I am thrilled that they now view them as something they can use to demonstrate their learning rather than just for playing Angry Birds!

    Grade 5 & 6 

    I teach grade 5/6 and have used the iPads for various activities. So far, my classes favourite and most useful activity was using Doceri for doing self-assessments and peer-assessments on some opinion writing that we did. The students were able to help themselves and each other made adjustments to their work so they could have the best final product that she can!

    Grade 5 & 6 

    Hesitation. Excitement. Steep learning curve. Defending this tool amongst skepticism of its application to education. Battling the gaming mindset. Researching apps. Filtering these said apps. Controlling the flurry of ideas. Troubleshooting glitches and misunderstandings. Experimenting and collaborating alongside my students in order to maximize their educational potential. Repeat.
        I have been through the above cycle many times in the year we have had iPads at Marlborough School. Despite the step I am going through in this cycle, two constants remain – that students are engaged and motivated in their learning. They are invested in communicating their understanding, they are eager to continue delving deeper into the subject matter and they continue to amaze me with their proficiency in using this tool to expand their inquiring minds.
        My personal journey to believing in the educational necessity of devices in the classroom was not always easy. The primary concern I had constantly lurking in the background, was time. How much more time can I squeeze out of our day to devote to learning this tool, experimenting, playing and finally applying their understanding to communicate the curriculum outcomes? What else do I have to give up to provide adequate exposure to each application? These were concerns I had to wrestle with and eventually let go of due to the positive feedback I received from my students in their ability to accurately prove their understanding to me. No longer were they regurgitating a series of outcomes, turning to me for feedback and affirmation of their success or failure, or completing a project to simply ‘get it done’. Students now have access to a multitude of ways to inquire, collaborate and prove their understanding.
        What I’ve come to realize throughout my uphill battle or success story is that it’s not about sacrificing precious time but investing in the the time now with the digital natives we have before us.

    Grade 5 & 6 

    I admit to being a bit of a technophobe. I get easily frustrated with technology when it does not work (which is all the time) and wonder if we are using our brains less because we have "an app for that." Well, this year I've been converted. The main reason for this is that I like to push my students to be creative when they show their thinking, and ipads allow me to see more of my students' creativity than when they use pen and paper. My students use animation apps to demonstrate what they understand about the properties of air, for example, and each animation has an original twist to it even though they are about the same topic. Even reading is made more creative with this technology. In my classroom, I record students reading and then file it in their own folder in the ipad. Other students can then listen to their classmates reading and comment on what they should be working on and what they have improved on. The comments they make are specific and creative, I think, because students are working with concrete data. This former technophobe can't deny that ipads have provided each of my students with a tool to be creative and represent their thinking in an original way.


    Thursday, May 9, 2013

    Exporting an ePub from iPad to computer

    This a video tutorial of how we export our Book Creator App ebooks from our iPads to a computer.

    If you watch this and it makes sense, let me know. If it doesn't make sense, let me know too :)

    Step 1: Exporting the book to iTunes on the iPad.


    Step 2: Copying ePub files from iTunes on your computer to another folder on your computer.


    Augmented Book 'Reviews'

    Aurasma
    Augmented reality keeps blowing people's mind. Every time I show the things we do with Aurasma and QR Codes, people can not believe what they see. The concept of augmented reality is really quite simple (in idea anyway). It simply layers images/videos over a 2D image. In Aurasma, the trigger image essentially acts like a barcode.

    iMovie
    This project was mostly conducted on Macbook Pros and iMacs as the students created videos using iMovie Trailers. We decided we wanted to look at book reviews/reading response in another way. I saw a tweet on Twitter where someone was showing their book trailers in iMovie. I wanted to step it up and make book trailers and then attach them to a book cover so other's could see what that student thought of that particular book.

    Planning the Trailer
    First, students had to plan their trailer. This proved very difficult as these grade 4s had not used iMovie before and did not have a clue how it worked or what was involved. In the end, we scrapped the on-paper plan and just started building the iMovie project. This gave the students an idea what was required in iMovie.

    Assessment
    We didn't actually make any crieteria until our first couple of groups were "finished" their first edit. The reson for this was that the students didn't know what a good trailer would consist of. We looked at a couple professionally made animated movie trailers and discussed what made them awesome. From there we made a checklist then went on to building a rubric.
    Target Rubric - Succes Criteria for our Book Trailers

    Co-created checklist of how professional movie trailer are made
    Students then went through and peer assessed each other's work. The feedback each student was important as they would base their editing on the feedback they were given. We developed a timeline of events so students knew the process that was required to finish their final trailer.

    The Self Assessment, Peer Assessment and Feedback loops timeline


    The Finished Product
    Here is an example of the finished trailers using the Aurasma App. 


    Monday, May 6, 2013

    Questions and Comments for Inclusive Learning Sharing

    Tweet Steve at: @SteveWClark

    I will leave this post up for anyone interested in asking questions about this blog or the learning we showcase that we have completed on iPads in our school. Feel free to add a comment, question and your email (if you wish) so we can continue the conversation!
    Use this QR Code to link to the blog on your iPad or Phone


    Saturday, May 4, 2013

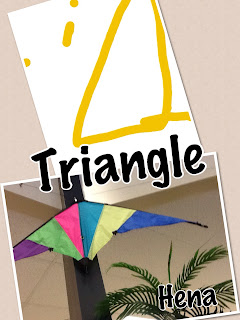
    Real Math, Real Shapes

    On Fridays in our Kindergarten class, we have our two classes (AM and PM) join together for the morning. It can be an intense time with 30 kinders all in the same small room.

    To help alleviate the pressure on everyone in the room, I help with centre time. I usually try to do something on the iPads but sometimes struggle as we only have centre time for 45 minutes at the most.

    This week I tried something that would hopefully take 45 mins at the most.

    We wanted the kinders to relate 2 dimensional shapes with real world objects. To do this we used three apps; The camera app, PicCollage App and Doodle Buddy App.

    Drawing in Doodle Buddy
    First, the students drew a shape in the Doodle Buddy App. We kept this simple to save time. Once finished they exported their drawing to the camera roll.


    Taking pictures of Real World Shapes
    Students then found an object that matched their chosen shape and took a picture of it.


    Putting it all together in Pic Collage
    Inserting images and text into PicCollage is an easy process. The students mastered this within a couple of minutes. We used a word list for the shape names each student needed.

    Exporting from the PicCollage App
    The usual export button (the box with the arrow popping out) is the important button in this app for exporting the Pic Collage to the camera roll. See the images below to see what it should look like. 


    The Finished Pieces
    Approximately 30 minutes later, this is what the students had produced. AWESOME!